Are you afraid of hemming knits? Especially those lovely,
thin knits? You’ve probably read about walking foot this and twin needle that
or cover stitch machine (wouldn’t that be nice?). Have you tried stitching it
normally and ended up with a stretched out wonky mess? Me too! Doesn’t it make
you want to scream and throw things? Though I do own a walking foot (and like
it) and twin needles, I discovered a way to hem lightweight cotton knits with a
regular machine and regular foot. The secret is the DIYer’s old friend - freezer
paper. You can buy it at your local grocery store or wally world for a couple
bucks. It looks like this:
Now how does this escaped kitchen product help in this sewing situation? It’s going to moonlight as cheapo tear-away fusible stabilizer. Take your fabric (here I’m hemming a skirt) and press your hem. Note: pressing is not ironing. When you iron you rub your hot iron on your fabric. When you press, you press it on the fabric (no wiggling, no moving, just pressing) for a few seconds, then lift and move to the next section. I usually use as high a heat as I can for the fabric and a little steam. I know, it seems weird to press a knit, but trust me – it makes it look awesome. So here’s my pressed skirt hem:
Take your freezer paper and cut a thin strip – I did about 1.5” wide. Note the difference in the 2 sides of the freezer paper. One side is matte, like regular paper. The other is shiny (that’s the “plastic coated” part). I tried to take a picture. The large piece is showing the paper side, the little strip shows the shiny side:
Now press (no steam, med-high heat) that strip shiny side down on your fabric on top of your pressed hem. It only takes a couple seconds to stick it in place. You want to cover the entire width of the hem and a little past, like so:
Now, take your freezer papered fabric to the sewing machine. I'm using a stretch needle. Lots of people recommend ballpoint needles for knits, but I say ditch the ballpoints for stretch needles. You won’t be sorry. I almost never have skipped stitch problems when using a stretch needle (its ballpoint is tinier and the eye is a slightly different shape). I’m using a triple straight stitch (#22) – it has some give to it (unlike a standard straight stitch):
You’re going to stitch on the right side (outside/top side) of your garment, so the freezer paper is on the bottom. The freezer paper is going to prevent the feed dogs (those little grabby teeth in the base of the machine that move the fabric) from grabbing and stretching your fabric all out of shape, which is what makes it turn out all wonky:
Stitch along at a slow-medium pace. Watch carefully for any waves building in front of your presser foot. If you see the beginning of a wave, stop stitching and lift your presser foot just to release the pressure on that top layer of fabric (this is why you're sewing semi-slowly - so you can catch it before it's a disaster). Make sure that if your needle is up that you hold the fabric in place with your other hand so it doesn’t move anywhere (and ruin your beautiful straight line of stitching). If your needle is down, you’re golden. I suppose you could be crazy and have pressed another strip of freezer paper on top too to keep the pressure of the presser foot from making waves on top, but I didn’t. See the tiny wave in front of the presser foot?
Keep going until you’ve made it all the way around and back stitch a couple stitches to lock everything up tight, before removing it from the machine and clipping your threads. You’ll have a lovely hem that looks like this on the outside:
And like this on the underside:
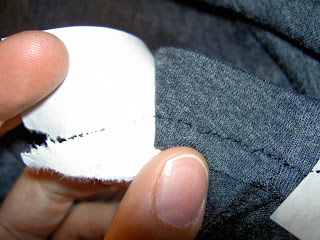
Now to get rid of the pesky, I mean helpful, paper. Carefully grab and pull the freezer paper off your hem. Ignore my hideous cuticles. I live in a desert. I do dishes all the time. I never get my nails done. Be gentle so you don’t rip your beautiful stitches out:
Now the underside looks like this (you can trim the excess off carefully if you want):
And the outside looks like this:
See - not hard! It takes a few extra minutes (maybe 5 to
apply the freezer paper and another 5 to remove it) and a couple bucks
invested in enough freezer paper to hem everything in your house and probably your neighbor's house too. But you used
a regular foot on a regular machine! And it looks awesome!


No comments:
Post a Comment